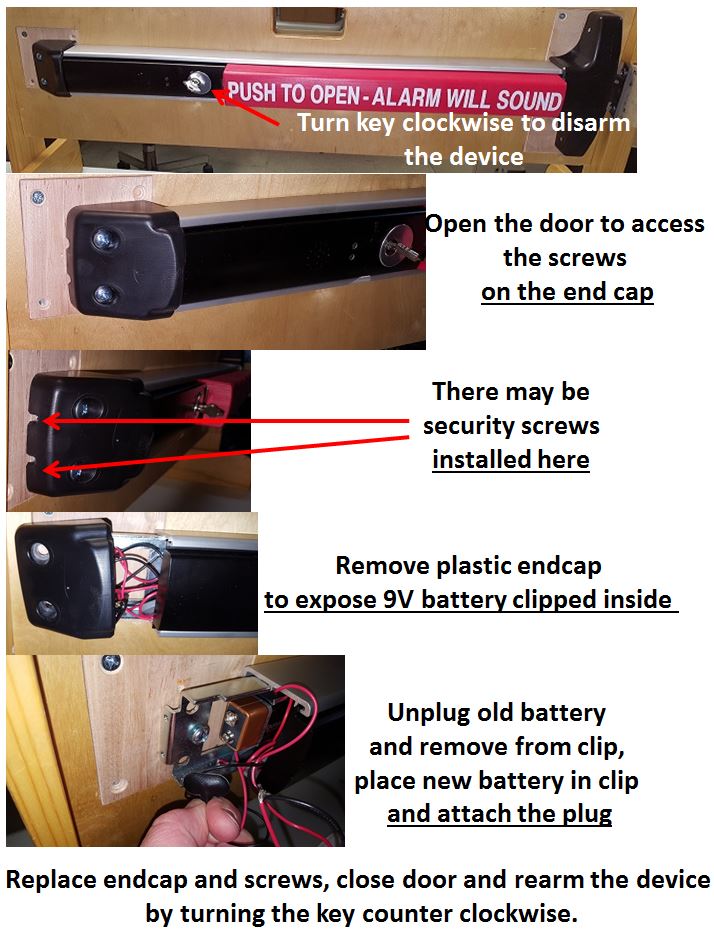
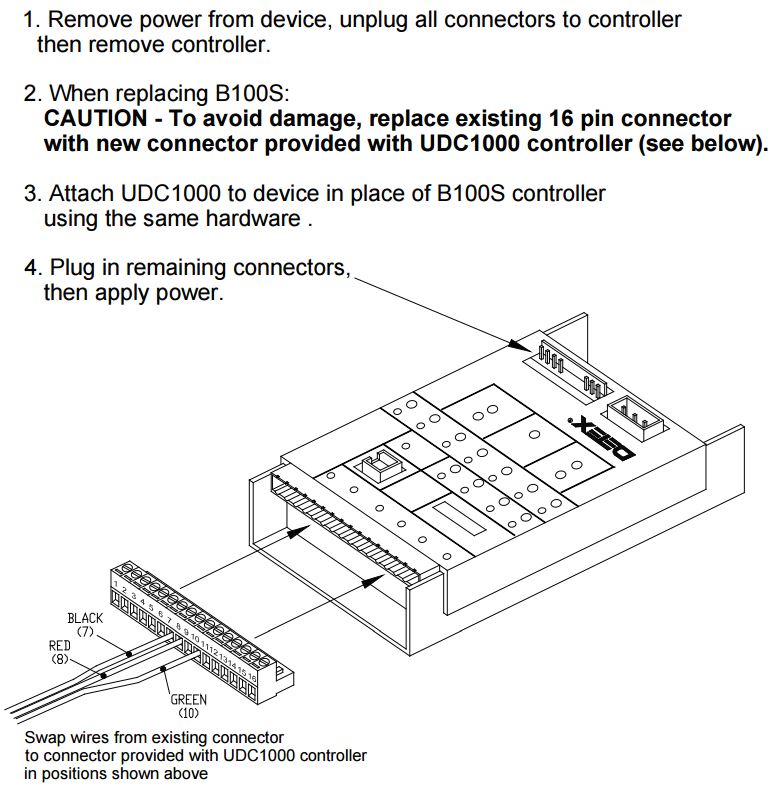
FAQ
Alarmed Exit Devices (EA, EB, EB W)
One Or Both LEDs are Constantly On And The Unit Will Not Arm
Remove all power (including battery) for at least 10 seconds and then re-apply to reboot the processor.
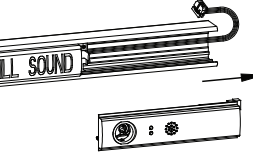
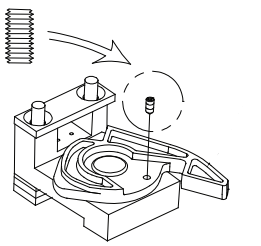
Why Can't I Remove My Key When The Bar Is Disarmed?
The Keystop feature is installed. This is a security feature that automatically turns the alarm on when the key is removed.
If you no longer want this feature, remove the filler plate from the bar and take out the keystop setscrew:
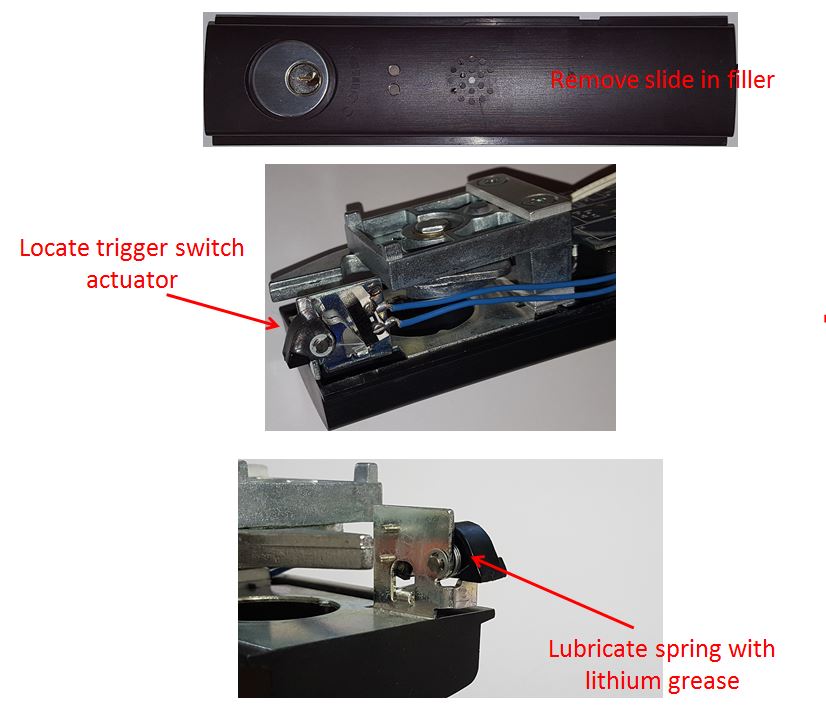
When Unit Is Armed, LEDs Work, But The Device Doesn't Beep After The Green LED Goes Off
The actuator is sticking to the micro switch. Call Detex - 800-729-3839
Follow these instructions:
Why Isn't The Status Indicator Working?
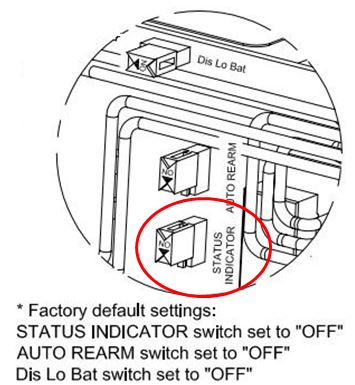
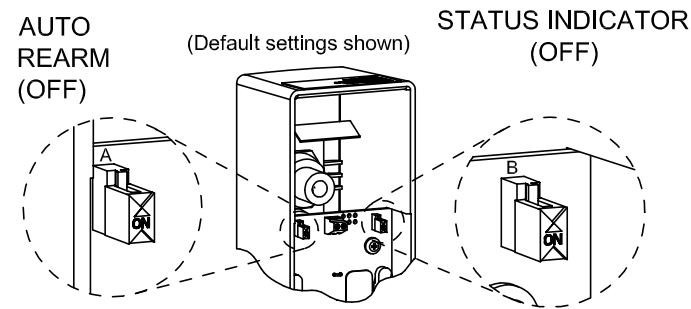
Status indicator is set to “Off” by default. The yellow slide switch for status indicator needs to be slid to on. The unit must be off and battery removed before the change can be made.
Why Is The LED Not Blinking?
Status indicator set to “Off” by default. Yellow slide switch for status indicator needs to be slid to on. The unit must be off and battery removed before the change can be made.

Why Does The AC Powered Unit Give A Low Battery Indication?
Battery not installed. OR Low battery
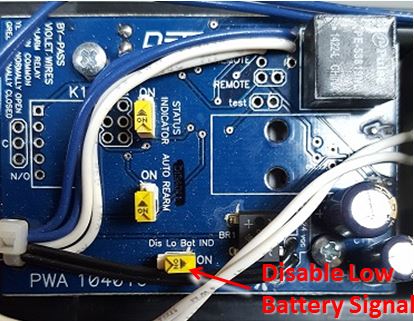
Install battery. If battery is not desired, disconnect power and slide the 'Dis Lo Bat IND' switch to 'ON' position.
Why Is There No LED Activity When Key Is Turned To Armed Position?
Dead or weak battery.
Battery not secured to connector correctly.
Battery connector or wires damaged.
No AC power.
Install new battery, LED's should flash and the siren beep once. Secure battery correctly. Verify power from transformer and check for correct voltage at connector P2. AC powered unit gives a low battery indication.
How To Order Parts
To identify part numbers, drawings can be found in the instructions on this page.
A distributor can also be found for you during your call.
You can also call one of our go to parts distributors:
Door Service - 314-487-0800 Ext. 2
Electric Latch Retraction (ER)
Why Does My ER Motor Keep Spinning?
Top or Bottom Rods may need adjustment.
How To Order Parts
To identify part numbers, drawings can be found in the instructions on this page.
A distributor can also be found for you during your call.
You can also call one of our go to parts distributors:
Door Service - 314-487-0800 Ext. 2
Delayed Egress (EE)
Why Is The Status Indicator Not Working?
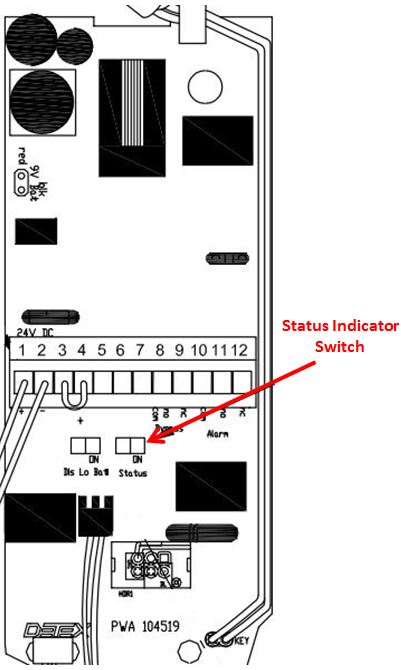
Status indicator set to “Off” by default. Yellow slide switch for status indicator needs to be slid to on. The unit must be off and battery and hardwired power removed before the change can be made.
Why Is The LED Not Blinking?
Status indicator set to “Off” by default. Yellow slide switch for status indicator needs to be slid to on. The unit must be off and battery and hardwired power removed before the change can be made.

Why Does My EE Not Arm?
Be sure that the dead latch is being pushed in. If the strike isn't aligned properly, it may not keep the dead latch in.
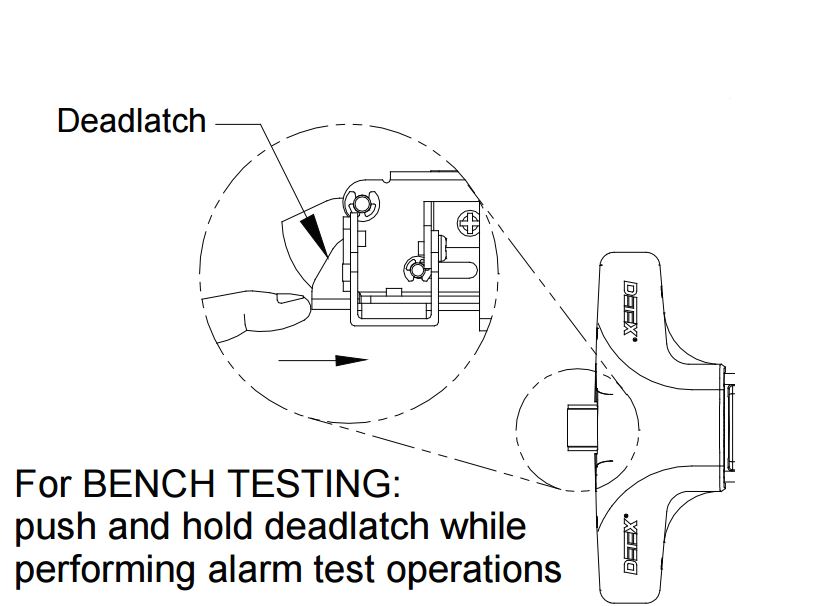
If it arms while pushing in the deadlatch, the strike may need to be shimmed closer to the latchbolt.
If it doesn’t arm after pushing in the deadlatch, examine the plugs in the latch assembly:
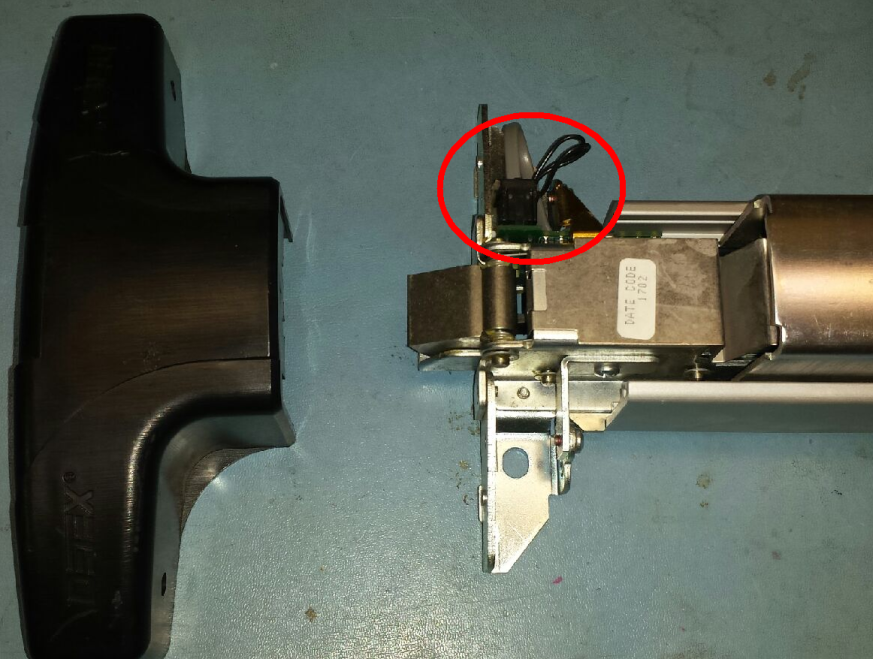
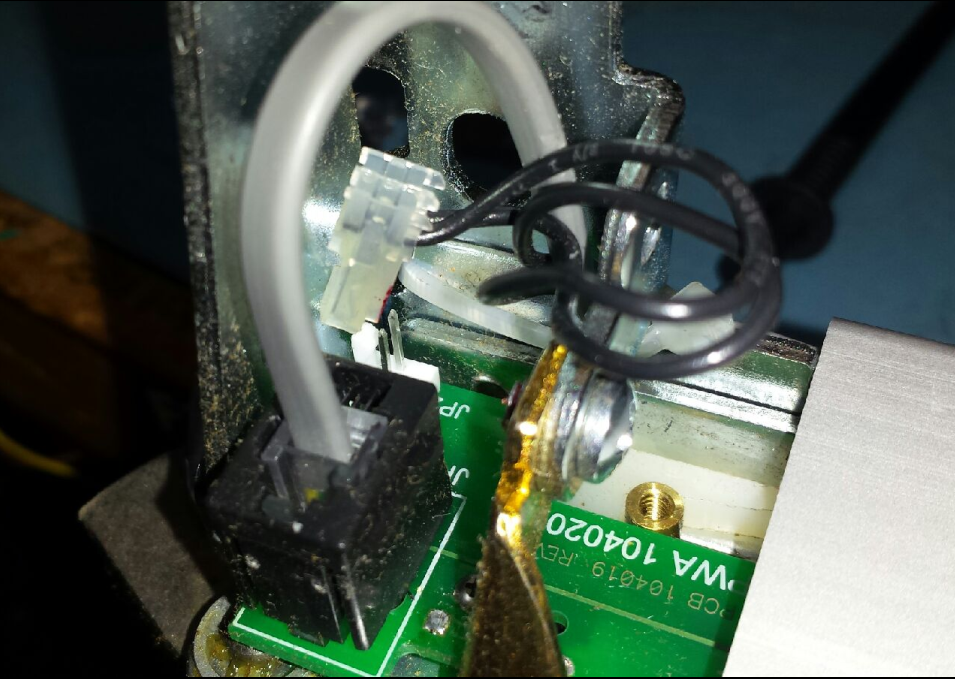
Make sure the 2 pin connector is fully seated on both pins and the modular (phone type) is clicked in here and also at the main circuit board.
How To Order Parts
To identify part numbers, drawings can be found in the instructions on this page.
A distributor can also be found for you during your call.
You can also call one of our go to parts distributors:
Door Service - 314-487-0800 Ext. 2
ECL-230D, ECL-600
Why Does The Alarm Sound When Extending The Bolt?
Make sure the time marks are aligned correctly
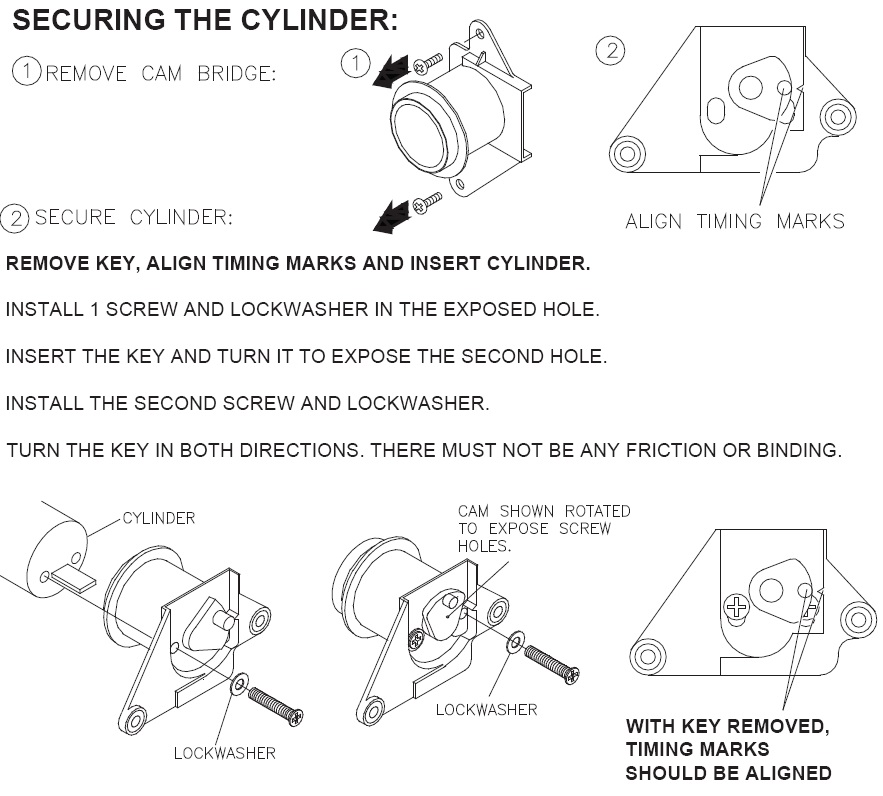
Push the bar completely in, make sure the bar springs back out and turn the key 360 degrees clockwise
Make sure the dead bolt is not hitting the strike or bottoming out in the strike
What Do I Do If My Paddle/Sign Breaks?
If your device has 2 bolts holding the paddle on (ECL-230D), replacement part number is, ECL-8220 or if you have 3 bolts (ECL-230D-PH) replacement part number is ECL-2109
Why Is The Device Going Into Alarm And The Key Getting Stuck Before I Can Finish Locking Or Unlocking It?
There is a 360 degree rotation and the alarm may sound briefly during the turn of the key, it is important to keep turning even if you hear the alarm.
Why Is My Device Staying In Alarm After I Remove My Key?
Rim cylinder timing may be off. Timing is adjusted on the cam bridge assembly. See diagram below:

I Lost My Cover Lock Key
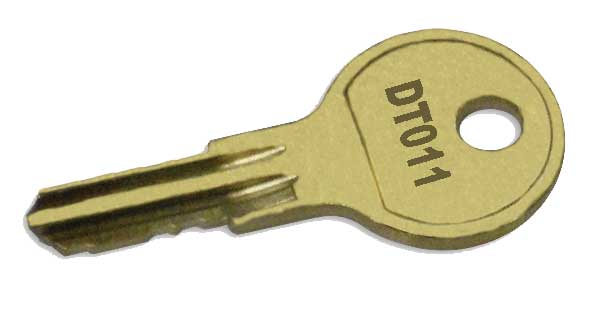
The ECL-405 (DTX00XX) represents key numbers from 11 to 20. This ID will also be engraved on the key you are looking for.
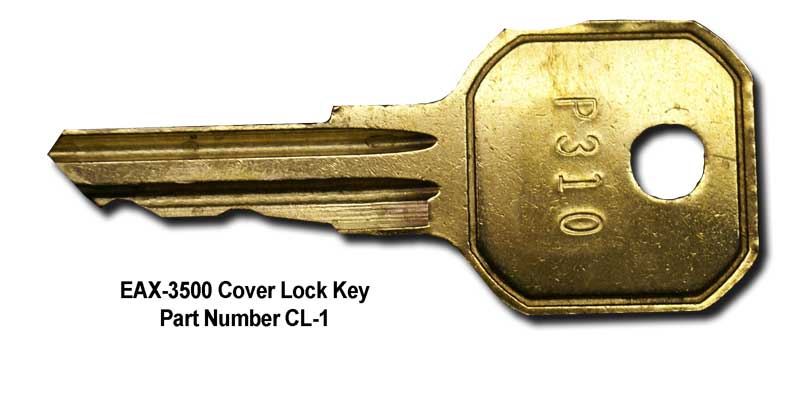
The CL-1 is for the EAX-3500, which is a wafer lock, not a screw cover.
How To Order Parts
To identify part numbers, drawings can be found in the instructions on this page.
A distributor can also be found for you during your call.
You can also call one of our go to parts distributors:
Door Service - 314-487-0800 Ext. 2
EAX-3500
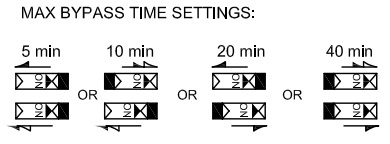
How Do I Increase Or Decrease The Maximum Time Delay?
Adjust slide switch to the appropriate position
When I Turn The Key To Reset, Why Doesn't The Time Bar Display Reset?
All LED's and bar display are fully on reset by unplugging both modular cables and plugging the control board back in first, then the display board.

If LED's return to normal. Test by adding time and opening and closing door should reset the display. Opening the door should sound the alarm with no time entered. This would be working correctly.
Display has 1 bar and can’t clear. Reset by unplugging both modular cables and plugging the control board back in first and then the display board. If this doesn’t correct it then check to see that the micro switch being released. If it is released then Cycle power to reset, if no help. Replacement board kit is 104393. This includes all 3 circuit boards and the modular cable.
Why Does The Unit Chirp Every 20-30 Seconds?
Low battery indication.
Check AC power to the device for 24VAC plug-in transformer
If other then 24VAC replace with plug-in 103951
Battery should be replaced every 3-years
Battery backup 1-day fully charge
U-6 hot to the touch indicates bad battery or short in the wires

Why Does The Alarm Sound When Pushing The Button To Add Time?
Check the cam assembly arm that activates the Micro Switch. Is it staying up and not returning down?
Corrective action would be to loosen the two cam screws a bit they could be over tightened causing binding. If there is still an issue replace the cam (p/n 102680).
I Can't Add Time To The Bar Display
Turn the key counter clockwise to reset and release the key. Then push the time button to increment bar display.
If you hold the key in the reset position and don’t release it and push the time button to increment, the display will start to add time but will alarm every time the button is pushed.
Pushing and holding the button to add time the bar graph starts to increment part of the way and the alarm sounds. Also, pushing the button 1 step at a time sounds the alarm.
The cam lever is holding in the micro switch and not returning back down.
Corrective action would be:
Loosen the two cam screws a bit they could be over tightened causing binding. If there is still an issue replace the cam, part number 102680.
Why Is The Alarm Operating Intermittently?
Reset unit by removing battery power and building power, and re-connecting.
Why Is The Alarm Not Functioning Correctly?
Reset unit by removing battery power and building power, and re-connecting.
I Lost My Cover Lock Key

The ECL-405 (DTX00XX) represents key numbers from 11 to 20. This ID will also be engraved on the key you are looking for.

The CL-1 is for the EAX-3500, which is a wafer lock, not a screw cover.
How To Order Parts
To identify part numbers, drawings can be found in the instructions on this page.
A distributor can also be found for you during your call.
You can also call one of our go to parts distributors:
Door Service - 314-487-0800 Ext. 2
EAX-500
Why Is The Device Not Arming?
The unit could be handed to the wrong side, or the magnet may be out of alignment.
Unplug battery and re-connect, if the unit beeps 5 times the unit is not handed.
Use the magnet locator when mounting the device.
If JP1 is cut the small stock Detex magnet will no longer work and the unit is now looking for wired contacts.
Why Does The Device Not Chirp 3 Times After Arming?
Devices silent arming option is enabled. To turn off this feature:

Why Does The Device Go Straight Into Alarm After Arming?
May be set to auto rearm(non-extended bypass) and the magnet on the frame not aligned properly.
Re-hand the device and ensure door stays closed throughout entire arming process.
The Magnet Only Works On One Side Of The Device
Disarm the device by turning your key clockwise. Look on the circuit board near the sticker saying "500", there are two metal prongs with white lettering near them saying 'Mag Handing'. Short them together using something metal like a screwdriver or a key. The unit should beep 5 times. Reinstall the device with the door open, arm by turning the key counter-clockwise and close the door. You should hear 1 chirp and then the device should start the 15 second arming delay indicated by rapid flashing of green light, followed by 3 chirps, indicating that it is armed.
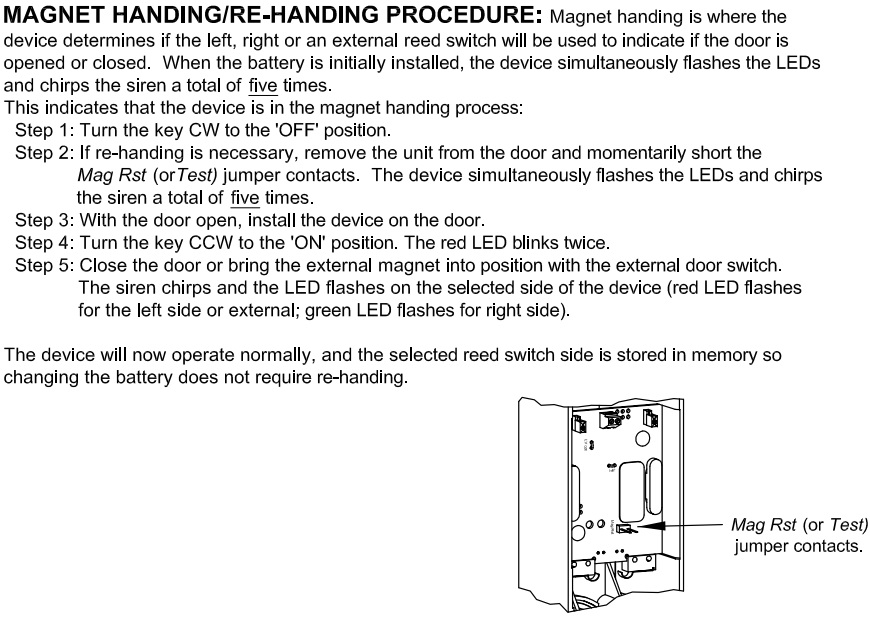
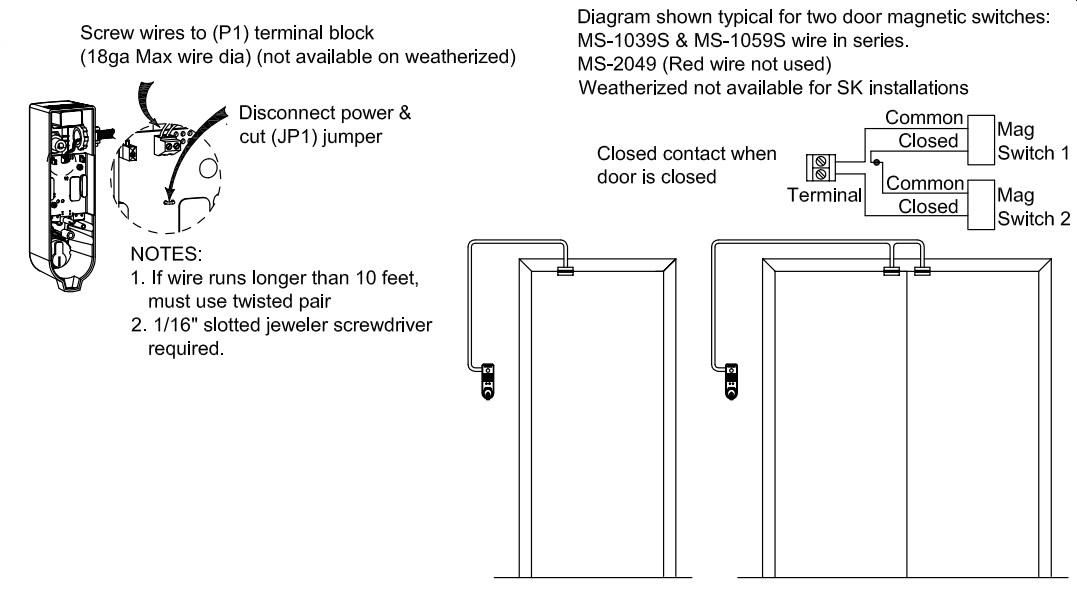
If JP1 is cut on the board, the unit is made to mount on the wall and use a external magnetic switch.
Please refer to the installation instructions for more information on how to re-hand your device
How Do I Change The Handing Of My Device?
Disarm the device by turning your key clockwise. Look on the circuit board near the sticker saying "500", there are two metal prongs with white lettering near them saying 'Mag Handing'. Short them together using something metal like a screwdriver or a key. The unit should beep 5 times. Reinstall the device with the door open, arm by turning the key counter-clockwise and close the door. You should hear 1 chirp and then the device should start the 15 second arming delay indicated by rapid flashing of green light, followed by 3 chirps, indicating that it is armed.

If JP1 is cut on the board, the unit is made to mount on the wall and use a external magnetic switch.
Please refer to the installation instructions for more information on how to re-hand your device
How Do I Install On A Pair of Doors?
The device mounts to the wall and 2 external magnetic switches need to be used. The switches are wired in series and connected to the green terminal block on the top of the board. The JP1 jumper wire also needs to be cut on the board.
The Unit Is Beeping Every 45 Seconds
The 9V battery needs to be replaced with a name brand, alkaline battery.
Why Is The Status Indicator Not Working?
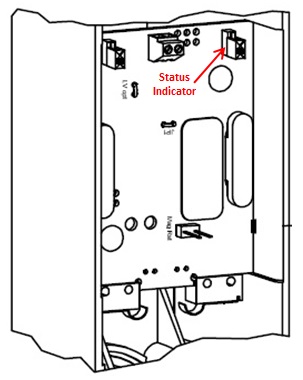
Status indicator set to “Off” by default. Yellow slide switch for status indicator needs to be slid to on. The unit must be off and battery removed before the change can be made.
Why Is The LED Not Blinking?
Status indicator set to “Off” by default. Yellow slide switch for status indicator needs to be slid to on. The unit must be off and battery removed before the change can be made.

Why Can I Not Remove My Key When The Device Is Disarmed?
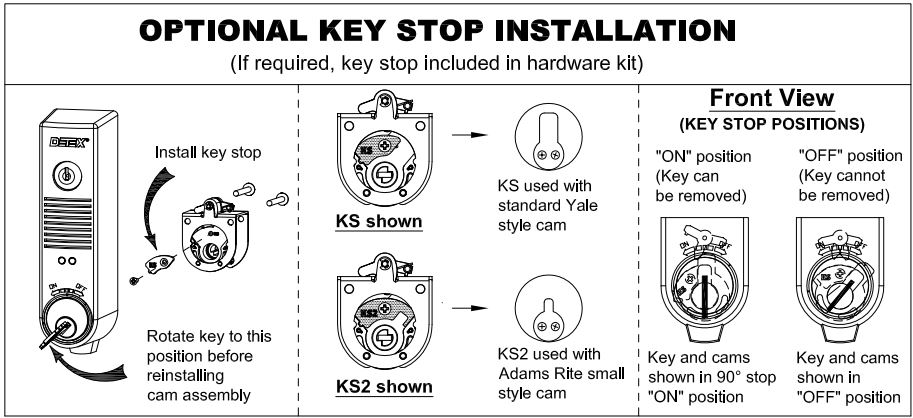
Key stop being used. This is a safety feature that will not allow a key holder to walk away from the device with their keys without the alarm being armed.
When I Turn My Key, Why Isn't The Actuator Arm Moving?
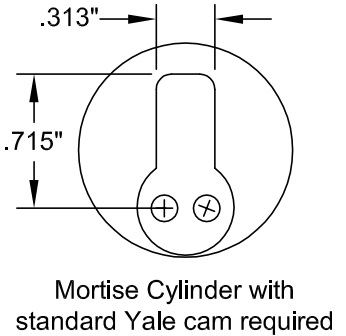
Wrong cam (need standard Yale), or the mortise cylinder is installed upside down.
Why Do I Need To Change The Battery So Often?
The status indicator is set to "on". The battery life when using the status indicator will only get up to 3 months.
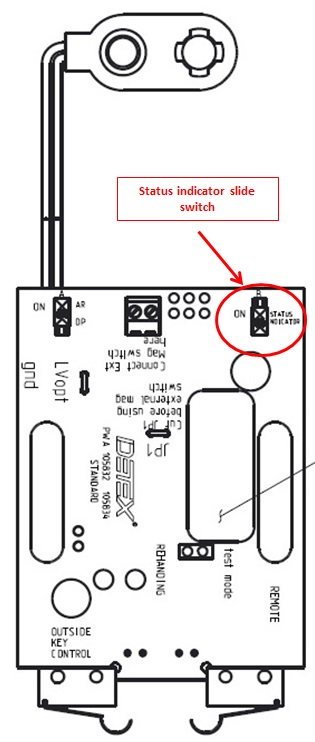
This can be turned off by the slide switch on the circuit board as shown in the picture below. Remove the battery first, adjust the switch, replace the battery and rearm.
With status off, battery life can last for up to 12 months.
Note: Use name brand alkaline battery. If unit has gotten wet, it will drain the battery.
I Lost My Cover Lock Key

The ECL-405 (DTX00XX) represents key numbers from 11 to 20. This ID will also be engraved on the key you are looking for.

The CL-1 is for the EAX-3500, which is a wafer lock, not a screw cover.
How To Order Parts
To identify part numbers, drawings can be found in the instructions on this page.
A distributor can also be found for you during your call.
You can also call one of our go to parts distributors:
Door Service - 314-487-0800 Ext. 2
EAX-2500
How To Install For A Pair Of Doors
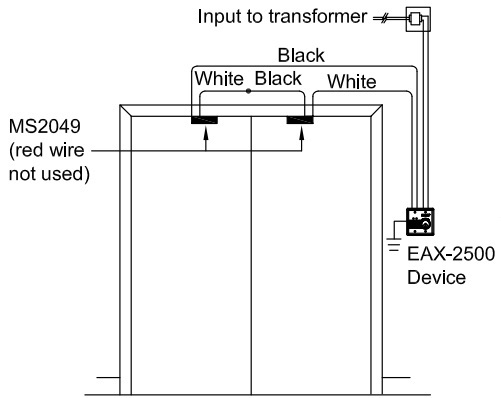
The device mounts to the wall and 2 external magnetic switches need to be used. The switches are wired in series and connected to terminals 5 & 6. See diagram below:
Why Is My Device Going Straight Into Alarm?
Two possible reasons:
1. Tamper plunger is not being held back by the screw on the upper left of the front of the device. Make sure the unit is mounted and the top left tamper screw is installed. Check That the security plunger is engaging the security micro switch on the back of the PCB.
2. Set to auto rearm(non-extended bypass) and the magnet on the frame not aligned properly. Isolate the device by using a jumper to simulate the door closure in inputs 5 and 6. If your device works, then check you magnet switch continuity. The magnetic switch is a closed contact when the door is closed and opens when the door is opened. These two wires should be connected to terminals 5 & 6.
Why Does My Device Not Alarm When The Door Opens?
The likely causes are that either:
- Your door contact is not activating when the door closes. In this case, your device will not arm if the contact wires are removed from the device.
- Electric power was applied across terminals 5 and 6. In this case, your device will still arm after the door contact wires are removed from the device.
Why Is The Status Indicator Not Working?
Status indicator set to “Off” by default. Yellow slide switch for status indicator needs to be slid to on. The unit must be off and battery removed before the change can be made.

Why Is The LED Not Blinking?
Status indicator set to “Off” by default. Yellow slide switch for status indicator needs to be slid to on. The unit must be off and battery removed before the change can be made.

Why Can I Not Remove My Key When The Device Is Disarmed?
Key stop being used. This is a safety feature that will not allow a key holder to walk away from the device with their keys without the alarm being armed.

When I Turn My Key, Why Isn't The Actuator Arm Moving?
Wrong cam (need standard Yale), or the mortise cylinder is installed upside down.

Why Do I Need To Change The Battery So Often?
The status indicator is set to "on". The battery life when using the status indicator will only get up to 3 months.
This can be turned off by the slide switch on the circuit board as shown in the picture below. Remove the battery first, adjust the switch, replace the battery and rearm.
With status off, battery life can last for up to 12 months.
Note: Use name brand alkaline battery. If unit has gotten wet, it will drain the battery.

I Lost My Cover Lock Key

The ECL-405 (DTX00XX) represents key numbers from 11 to 20. This ID will also be engraved on the key you are looking for.

The CL-1 is for the EAX-3500, which is a wafer lock, not a screw cover.
How To Order Parts
To identify part numbers, drawings can be found in the instructions on this page.
A distributor can also be found for you during your call.
You can also call one of our go to parts distributors:
Door Service - 314-487-0800 Ext. 2
EAX-300
How Do I Change The Door Prop Time?
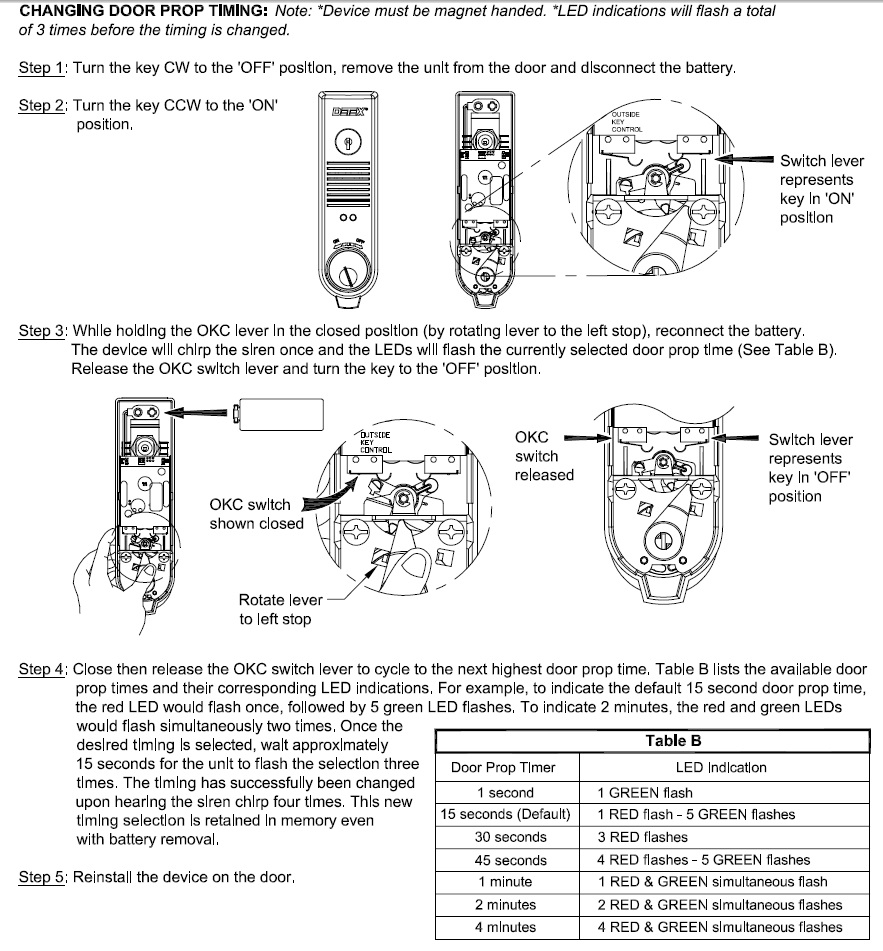
Refer to the installation instructions and follow the instructions
Why Is My Device Not Arming?
The key is turned to the armed position, but the device does not sound when the door opens and the door prop time expires.
Handed to wrong side.
Unplug and reinsert battery, 4 chirps is in door prop mode.
5 chirps, the unit is not handed. Confirm the magnet is aligned correctly.
Disarm the device by turning your key clockwise. Look on the circuit board, there are to metal prongs with white lettering saying 'Mag Handing'. Short them together using metal like a screwdriver or the key. The unit should chirp 5 times. Reinstall the device with the door open, turn device to on, and close door. You should hear 1 chirp and then the device is ready.
If JP1 is cut on the board, the unit is made to mount on the wall and use a external magnetic switch.
Why Is The Status Indicator Not Working?
Status indicator set to “Off” by default. Yellow slide switch for status indicator needs to be slid to on. The unit must be off and battery removed before the change can be made.

Why Is The LED Not Blinking?
Status indicator set to “Off” by default. Yellow slide switch for status indicator needs to be slid to on. The unit must be off and battery removed before the change can be made.

Why Can I Not Remove My Key When The Device Is Disarmed?
Key stop being used. This is a safety feature that will not allow a key holder to walk away from the device with their keys without the alarm being armed.

When I Turn My Key, Why Isn't The Actuator Arm Moving?
Wrong cam (need standard Yale), or the mortise cylinder is installed upside down.

Why Do I Need To Change The Battery So Often?
The status indicator is set to "on". The battery life when using the status indicator will only get up to 3 months.
This can be turned off by the slide switch on the circuit board as shown in the picture below. Remove the battery first, adjust the switch, replace the battery and rearm.
With status off, battery life can last for up to 12 months.
Note: Use name brand alkaline battery. If unit has gotten wet, it will drain the battery.

I Lost My Cover Lock Key

The ECL-405 (DTX00XX) represents key numbers from 11 to 20. This ID will also be engraved on the key you are looking for.

The CL-1 is for the EAX-3500, which is a wafer lock, not a screw cover.
How To Order Parts
To identify part numbers, drawings can be found in the instructions on this page.
A distributor can also be found for you during your call.
You can also call one of our go to parts distributors:
Door Service - 314-487-0800 Ext. 2
AO19
My Latch Light Never Comes On. It Stays On Close Speed
The arm may have been installed wrong. To reinstall the arm, remove from spindle and put rocker switch to hold open. Put door at 90 degrees to frame and reinstall the arm as per instructions.
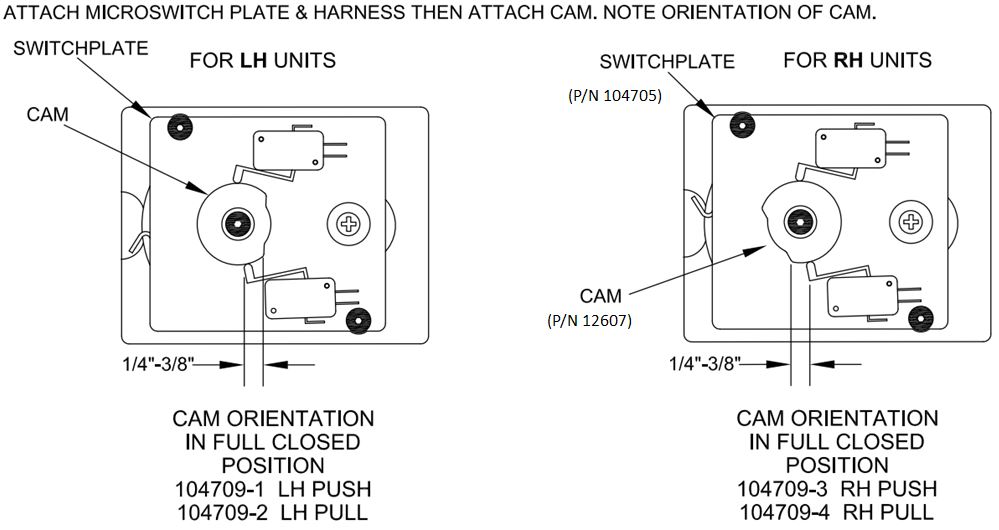
You may also have a cam orientation issue on top of the motor gear box where the back check and latch limit switches are controlled. Follow the chart below to re-position cam:
How To Order Parts
To identify part numbers, drawings can be found in the instructions on this page.
A distributor can also be found for you during your call.
You can also call one of our go to parts distributors:
Door Service - 314-487-0800 Ext. 2
Series 800
I Have Input Power, But No Output Power
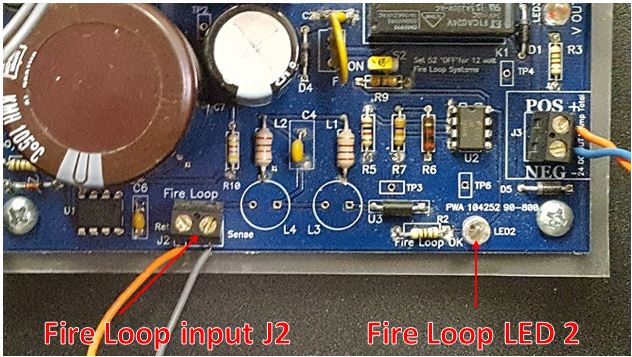
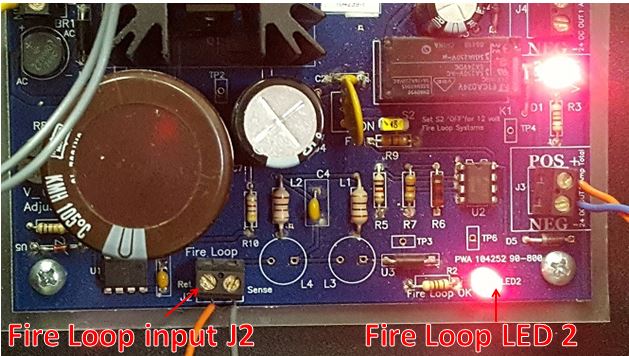
If there are wires landed on the J2 fire loop, check the LED2. If it is not lit, the fire loop is open:
When fire loop is closed:
How To Order Parts
To identify part numbers, drawings can be found in the instructions on this page.
A distributor can also be found for you during your call.
You can also call one of our go to parts distributors:
Door Service - 314-487-0800 Ext. 2

